Custom EPiServer properties with Dojo
Creating custom page properties in EPiServer has undergone some changes in the latest version of the CMS. No more ASP.NET server side controls. Instead you are required to write a client side representation of your property in Dojo. A choice criticized by many, but once you’ve gotten the hang of the Dojo way of doing things it actually becomes a quite reasonable choice. Dojo is a widely used and very well documented toolkit that excels in widget-like functionality and offers a very wide arrange of different base classes to inherit functionality and properties from. The documentation is excellent (unfortunately the EPiServer documentation is extremely lacking) and as long as you have a basic understanding of JavaScript creating simple plugins is trivial.
The first thing you need to understand is the anatomy of a Dojo plugin, so lets have a look.
define([
  // These are the dependencies for our created widget.
  "dojo/dom",
  "_templatedMixin",
], function (dom, _templatedMixin) {
  // Once all modules in the dependency list have loaded, this
  // function is called. It's important to understand that this function need to be
  // passed all the modules in your dependency list, for example we have the 'dojo/dom' dependency
  // which is why we pass our function an argument of dom.
  // This is so that we can access those dependencies in our actual widget.

  declare("namespace.ourawesomeproperty", _templatedMixin, {
    // The next step is to call the declare function
    // The first argument is the name and optional namespace of our newly created widget
    // The second argument is the widget we inherit from.
    // If we want to inherit several widgets we can put them in an array []
    // The third argument is this javascript object (the one that contains this comment).
    // This is where we declare any custom properties or functions for our widget

    myprop: "Dojo is awesome!",
  });
});
It looks more daunting than it is. Dijit widgets are defined in the AMD (Asynchronous Module Definition) pattern where you first define all the dependencies of your module, then declare your actual JavaScript object (with the declare function).
But once we have a Dijit module defined and ready to go we need to somehow hook it up to EPiServer and
tell EPi which property we want to use our shiny module for. This isn’t very difficult either. We simply
decorate any property on a ContentType with the ClientEditor attribute, like this:
[ClientEditor(ClientEditingClass = "ournamespace.ourawesomewidget")]
public virtual string SomeProperty { get; set; }
And suddenly all strings will be handled by the ournamespace.ourawesomewidget module. Pretty neat huh?
But hey, wait a minute, where do we actually put our created Dijit module for EPiServer to find it?
This is an excellent question and here we unfortunately need to mix in some site configuration. In the module.config you can
define where the Dojo loader should look for files with a specific namespace. In the alloy templates site we find this:
<dojo>
    <!-- Add a mapping from alloy to ~/ClientResources/Scripts
    to the dojo loader configuration -->
    <paths>
        <add name="alloy" path="Scripts" />
    </paths>
</dojo>
Ok, so there’s a <dojo> tag where we can add <paths>, apparently this automatically
maps to the ~/ClientResources/ root folder. Also worth noting is that the name of our added path (in this case alloy)
must correspond exactly to the namespace of our modules for Dojo to understand where to look for them,
this means that if your namespace alloy.somenamespace.widgetname with a modules config as the one
above the path to your widget must be ~/ClientResources/Scripts/somenamespace/widgetname.js.
I hope all that made sense…
Anyway, enough with the background already, lets actually build something. Imagine our client wants to add some sort of property editor for creating polls to their site. Each poll has a title and a couple of possible answers.
Allright, lets start with modeling the data real quick. I’m gonna use ASP.NET Web Api as the back end for our polls.
public class PollsController : ApiController
{
    public List<SimplePoll> data = new List<SimplePoll>() {

        new SimplePoll {
             Header = "Who's your favorite chess player?",
             PollId = 1,
             Answers = new List<SimpleAnswer> {
                        new SimpleAnswer() {
                            Answer = "Bobby Fischer",
                            AnswerId = 1
                        },
                        new SimpleAnswer() {
                            Answer = "Magnus Carlsen",
                            AnswerId = 2
                        },
                        new SimpleAnswer() {
                            Answer = "José Raul Capablanca",
                            AnswerId = 3
                        },
                        new SimpleAnswer() {
                            Answer = "Garry Kasparov",
                            AnswerId = 4
                        },
                        new SimpleAnswer() {
                            Answer = "Emanuel Lasker",
                            AnswerId = 5
                        },
                    }
                },
        new SimplePoll {
             Header = "What's your favorite chess opening?",
             PollId= 2,
             Answers = new List<SimpleAnswer> {
                        new SimpleAnswer() {
                            Answer = "Sicilian dragon",
                            AnswerId = 1
                        },
                        new SimpleAnswer() {
                            Answer = "Scottish",
                            AnswerId = 2
                        },
                        new SimpleAnswer() {
                            Answer = "Queens Gambit",
                            AnswerId = 3
                        },
                        new SimpleAnswer() {
                            Answer = "English",
                            AnswerId = 4
                        },
                        new SimpleAnswer() {
                            Answer = "Kings gambit",
                            AnswerId = 5
                        },
                    }
                }
        };

    // GET api/
    public IEnumerable<SimplePoll> Get()
    {
        return data;
    }

    public SimplePoll Get(int id)
    {
        return data.FirstOrDefault(p => p.PollId == id);
    }

    public void Delete(int id)
    {
        data.Remove(data.FirstOrDefault(p => p.PollId == id));
    }
}

public class SimplePoll
{
    public int PollId { get; set; }
    public string Header { get; set; }
    public List<SimpleAnswer> Answers { get; set; }
}

public class SimpleAnswer
{
    public int AnswerId { get; set; }
    public string Answer { get; set; }
}
Just a real simple API controller with an in memory representation of our data. We’re going to need an answers controller as well…
public class AnswersController : ApiController
    {
        public void Delete(int id)
        {
            //Nah, don't wanna delete it
        }
    }
Ok, well that would of course work a little bit different if we actually had some sort of database or something to persist our polls and answers to, but we don’t, so lets just have a look at the Dijit now…
We start by configuring up a new namespace in the module.config (we could of course use the already existing alloy namespace, but where’s the fun in that?). Note how we can have two namespaces pointing to the same path without a problem.
<dojo>
        <!-- Add a mapping from alloy to ~/ClientResources/Scripts to the dojo loader configuration -->
        <paths>
            <add name="alloy" path="Scripts" />
            <add name="whatever" path="Scripts" />
        </paths>
    </dojo>
I create a Dijit module PollCreation.js:
define([
  "dojo/_base/connect",
  "dojo/_base/declare",
  "dojo/store/Memory",
  "dijit/_CssStateMixin",
  "dijit/_Widget",
  "dijit/_TemplatedMixin",
  "dijit/_WidgetsInTemplateMixin",
  "dijit/form/FilteringSelect",
  "dijit/TitlePane",
  "epi/dependency",
  "epi/epi",
  "epi/shell/widget/_ValueRequiredMixin",
  "epi/shell/widget/dialog/Dialog",
  "epi/cms/widget/_HasChildDialogMixin",
  "whatever/editors/PollDialog",
  "whatever/editors/DeleteableTextBox",
  "dojo/text!./templates/poll.html",
], function (
  connect,
  declare,
  Memory,
  _CssStateMixin,
  _Widget,
  _TemplatedMixin,
  _WidgetsInTemplateMixin,
  FilteringSelect,
  TitlePane,
  dependency,
  epi,
  _ValueRequiredMixin,
  Dialog,
  _HasChildDialogMixin,
  PollDialog,
  DeleteableTextBox,
  template
) {
  return declare(
    "whatever.editors.PollCreation",
    [
      _Widget,
      _TemplatedMixin,
      _WidgetsInTemplateMixin,
      _CssStateMixin,
      _ValueRequiredMixin,
      _HasChildDialogMixin,
    ],
    {
      templateString: template,
      intermediateChanges: false,
      value: null,
      store: null,
      currentPollData: null,
      postCreate: function () {
        // call base implementation
        this.inherited(arguments);

        this.connect(this.selectPolls, "onChange", this._onInputWidgetChanged);

        this._refreshDropDown(this.get("value"));
        this._refreshAnswers(this.get("value"));
      },
      isValid: function () {
        return this.selectPolls.isValid();
      },
      // Setter for value property
      _setValueAttr: function (value) {
        this.selectPolls.set("value", value);
        this._set("value", value);
      },
      _setReadOnlyAttr: function (value) {
        this._set("readOnly", value);
        this.selectPolls.set("readOnly", value);
      },
      _updateValue: function (value) {
        if (this._started && epi.areEqual(this.value, value)) {
          return;
        }

        this._set("value", value);
        this._refreshAnswers(value);
        this.onChange(value);
      },
      _createDialog: function () {
        this.pollDialog = new PollDialog({});

        this.dialog = new Dialog({
          title: "New poll",
          content: this.pollDialog,
          dialogClass: "epi-dialog-portrait",
        });

        this.connect(this.dialog, "onExecute", "_onExecute");
        this.connect(this.dialog, "onHide", "_onDialogHide");
        this.dialog.startup();
      },
      _onDialogHide: function () {
        this.focus();
      },
      _onButtonClick: function () {
        if (!this.dialog) {
          this._createDialog();
        }

        this.dialog.show(true);
      },
      _onExecute: function () {
        var pollData = this.pollDialog.get("value");

        var poll;

        jQuery.ajax({
          url:
            "/api/polls?pollHeading=" +
            pollData.pollHeading +
            "&answers=" +
            pollData.answers,
          type: "POST",
          contentType: "application/json; charset=utf-8",
          success: function (result) {
            poll = JSON.parse(result);
          },
          async: false,
        });

        this._refreshDropDown(poll.PollId);
        this.selectPolls.refresh();
      },
      _refreshDropDown: function (selected) {
        var pollData = [];

        jQuery.ajax({
          url: "/api/polls",
          contentType: "application/json; charset=utf-8",
          success: function (result) {
            result = JSON.parse(result);

            //push empty result in case they do not want a poll
            pollData.push({ name: "", id: -1 });

            for (var i = 0; i < result.length; i++) {
              pollData.push({ name: result[i].Header, id: result[i].PollId });
            }
          },
          async: false,
        });

        var store = new Memory({
          data: pollData,
        });

        this.selectPolls.store = store;
        this.selectPolls.set("value", selected);
      },
      _refreshAnswers: function (selected) {
        this.titlePane.destroyDescendants();

        if (selected <= 0) return;

        var selectedPoll;

        jQuery.ajax({
          url: "/api/polls/" + selected,
          contentType: "application/json; charset=utf-8",
          success: function (result) {
            selectedPoll = JSON.parse(result);
          },
          async: false,
        });

        for (var i = 0; i < selectedPoll.Answers.length; i++) {
          var textBox = new DeleteableTextBox({
            name: "text",
            readOnly: true,
            value: selectedPoll.Answers[i].Answer,
            style: "display:table; margin-bottom:10px;",
            answerId: selectedPoll.Answers[i].AnswerId,
          });
          this.titlePane.addChild(textBox, i);
        }
      },
      _onDeletePollClick: function () {
        if (confirm("Are you sure you want to delete this magnificent poll?")) {
          jQuery.ajax({
            url: "/api/polls/" + this.get("value"),
            type: "DELETE",
            contentType: "application/json; charset=utf-8",
            success: function (result) {},
            async: false,
          });

          this._refreshAnswers(-1);
          this._refreshDropDown(-1);
        }
      },
      _onInputWidgetChanged: function (value) {
        this._updateValue(value);
      },
    }
  );
});
Allright, now that’s quite a mouthful of javascript. Lets go through that top to bottom. First we declare our dependencies:
define([
    //These are some basic dojo-modules we need
    "dojo/_base/connect",
    "dojo/_base/declare",
    "dojo/store/Memory",

    //Some dijits that we want to utilize and inherit
    "dijit/_CssStateMixin",
    "dijit/_Widget",
    "dijit/_TemplatedMixin",
    "dijit/_WidgetsInTemplateMixin",
    "dijit/form/FilteringSelect",
    "dijit/TitlePane",

    //Oh look, epi has quite a few modules that we can use as well.
    //Unfortunately there's close to zero documentation, but hopefully we'll get some in the future.
    //Anyway, these are some modules that we need...
    "epi/dependency",
    "epi/epi",
    "epi/shell/widget/_ValueRequiredMixin",
    "epi/shell/widget/dialog/Dialog",
    "epi/cms/widget/_HasChildDialogMixin",

    //Look at this, I've even put some dependencies to modules in the same namespace
    // as our PollCreation dijit. I'll get back to these in a second.
    "whatever/editors/PollDialog",
    "whatever/editors/DeleteableTextBox",
    "dojo/text!./templates/poll.html"
   //This last one is interesting... We actually say here that we have a dependency to a plain html file
   // this file needs to be loaded and put into memory before we can run our module, I'll get back to this one as well.
]
We then pass in our function which has an argument for each of our dependencies:
function (
    connect,
    declare,
    Memory,

    _CssStateMixin,
    _Widget,
    _TemplatedMixin,
    _WidgetsInTemplateMixin,
    FilteringSelect,
    TitlePane,

    dependency,
    epi,
    _ValueRequiredMixin,
    Dialog,
    _HasChildDialogMixin,

    PollDialog,
    DeleteableTextBox,
    template
) {
You could name these arguments anything you want, but it’s good practice to name them the same as the dependency.
Allright, moving on… we then from our function return our declared dijit module:
 return declare("whatever.editors.PollCreation", [_Widget, _TemplatedMixin, _WidgetsInTemplateMixin, _CssStateMixin, _ValueRequiredMixin, _HasChildDialogMixin], {
        templateString: template,
        intermediateChanges: false,
        value: null,
        store: null,
        currentPollData: null,
Note how we inherit all functionality from _Widget, _TemplatedMixin, _WidgetsInTemplateMixin etc. especially the
_TemplatedMixin is interesting as it allows us to use a HTML template for our module.
Remember "dojo/text!./templates/poll.html" from our dependencies? This is where we make use of it.
We’ve put the value of the loaded poll.html into the template variable. The path to our poll.html is relative to our
module which means that the complete path to the html template is ~/ClientResources/Scripts/Editors/templates/poll.html.
All right, so we’ve put the html template into the templateString variable inside our module,
which means our module can access that variable using this.templateString which we shall see in practice soon.
Here’s the poll.html template:
<div class="dijitInline">
  <div style="position: relative;">
    <div
      data-dojo-attach-point="selectPolls"
      data-dojo-type="dijit.form.FilteringSelect"
      data-dojo-props="autoComplete: false, required: false"
      style="width: 400px"
    ></div>
    <span
      class="epiDeleteIcon"
      data-dojo-attach-event="click: _onDeletePollClick"
      style="width:16px; height: 16px; display:inline-block; display: inline-block; margin-left: 5px; position: relative; top: 3px; background: url('../Shell/7.7.0.0/ClientResources/epi/themes/sleek/epi/images/icons/commonIcons16x16.png'); background-position-y: -1168px;"
      alt=""
    ></span>
    <span
      data-dojo-attach-point="addButton"
      data-dojo-attach-event="click: _onButtonClick"
      style="position:relative; top: 3px; width: 16px; height: 16px; display: inline-block; background: url('../Shell/7.7.0.0/ClientResources/epi/themes/sleek/epi/images/icons/commonIcons16x16.png'); background-position-y: -1216px;"
    ></span>
  </div>
  <div
    style="margin-left:20px;margin-top:10px;"
    data-dojo-attach-point="titlePane"
    data-dojo-type="dijit.TitlePane"
    data-dojo-props="title:'Answers'"
  ></div>
</div>
Yeah, it’s quite a mess but not really that complicated. It’s very important to note that any template that is to be used by a Dijit module must have exactly one root element. If you by mistake add two divs as root element for example the EPiServer forms editing mode will simply fail to load… silently. No errors! Nothing! This can be very frustrating, but as long as you remember to use only one root node you should be fine.
Anyway, lets look at the interesting parts of the template. We have our root node (just a plain old div) and then another div
with position relative. Then we have a div with some dojo-markup on it, the data-dojo-attach-point tells our module that
we want to reference this div from our JavaScript file using the selectPolls variable and the data-dojo-type attribute
tells us that this div is actually a dijit.form.FilteringSelect module and as such has a lot of functionality and
properties of it’s own (this is why we need to declare a dependency to the _WidgetsInTemplateMixin, we have widgets in our template).
We then have a couple of buttons for deleting and creating a poll, they have data-dojo-attach-event attributes to specify
what functions in our module should be called when they are clicked. Finally we have another module which is a
dijit.TitlePane that will show our answers.
Like I said, not too complicated, but a lot of steps already and we haven’t even looked at the module in editmode yet!
Lets keep going through our module, next up are all the functions.
//The postCreate function is called directly after our module has been created.
//This is the place to do any intialization that we need.
postCreate: function () {
           // this.inherited is a function in Dojo that lets us call the base implementation
           // of the currently executing function. Pretty useful!
           this.inherited(arguments);

           //We connect any change events of our filteringselect to our own function defined further down
           // Remember that selectPolls was defined in our poll.html template with a data-dojo-attach-point
           // this is why we have access to it in this context
            this.connect(this.selectPolls, "onChange", this._onInputWidgetChanged);

            //We call our two methods to update the dropdown and answers box
            this._refreshDropDown(this.get('value'));
            this._refreshAnswers(this.get('value'));
        },
       //Pretty self explanatory, returns wether our module is valid or not
       // what's interesting here is that epi will call isValid on every module to make sure the page is valid
       // This is the place to do any validation of the value entered by the user, in our case there won't really be any.
        isValid: function () {
            return this.selectPolls.isValid();
        },
        // Setter for value property
        _setValueAttr: function (value) {
           //When the value of this module is set we also want to set the value of our filteringSelect
            this.selectPolls.set("value", value);
            this._set("value", value);
        },
      // This function is not strictly necessary, but if the module is in readonly mode it could be useful
      // (perhaps the editor is editing the page in a language where this property should not be available)
        _setReadOnlyAttr: function (value) {
            this._set("readOnly", value);
            this.selectPolls.set("readOnly", value);
        },
      //update the value of the module
        _updateValue: function (value) {
            if (this._started && epi.areEqual(this.value, value)) {
                return;
            }

           //We set the value and make sure to refresh the answers box
            this._set("value", value);
            this._refreshAnswers(value);
            this.onChange(value);
        },
      //Create dialog? What's this about?
      //This is where we pop another dialog to let the user create a new poll, it will be called from our buttonClick function
        _createDialog: function () {
            //Here we create a PollDialog which is another module that we haven't built yet, we'll get to it soon enough
            this.pollDialog = new PollDialog({
            });

            //Here we create an epi dialog (which is why we needed a dependency to epi/shell/widget/dialog)
            this.dialog = new Dialog({
                title: "New poll",
                content: this.pollDialog,
                dialogClass: "epi-dialog-portrait"
            });

           //onExecute is triggered when the user clicks OK on the dialog
           //onHide is triggered, well, when the dialog is hidden
           //we got some logic to run when these two occur so we just attach our own event handlers.
            this.connect(this.dialog, 'onExecute', '_onExecute');
            this.connect(this.dialog, 'onHide', '_onDialogHide');
            this.dialog.startup();
        },
        _onDialogHide: function () {
            this.focus();
        },
        _onButtonClick: function () {
           //If the dialog hasn't been previously created we create it
            if (!this.dialog) {
                this._createDialog();
            }
           //Show it! This function is called from the data-dojo-attach-event of our button in poll.html
            this.dialog.show(true);
        },
        _onExecute: function () {
           //This is triggered when the user clicks OK on the dialog
           // We get the value of our dialog (more on this later when we look at the dialog module)
            var pollData = this.pollDialog.get('value');
            var poll;

           //What? JQuery? Yes, jQuery! You can of course use the Dojo store functionality but I like to have better control over my ajax calls.
            jQuery.ajax({
                url: '/api/polls?pollHeading=' + pollData.pollHeading + '&answers='+pollData.answers,
                type: 'POST',
                contentType: 'application/json; charset=utf-8',
                success: function (result) {
                    poll = JSON.parse(result);
                },
                async: false //We run this synchronously for simplicity here so we don’t have to worry about handling everything in a callback.
            });

            this._refreshDropDown(poll.PollId);
            this.selectPolls.refresh();
        },
        _refreshDropDown: function (selected) {
            var pollData = [];

            jQuery.ajax({
                url: '/api/polls',
                contentType: 'application/json; charset=utf-8',
                success: function (result) {
                    result = JSON.parse(result);

                    //push empty result in case they do not want a poll
                    pollData.push({ name: '', id: -1 });

                    for (var i = 0; i < result.length; i++) {
                        pollData.push({ name: result[i].Header, id: result[i].PollId });
                    }
                },
                async: false
            });

            //This is where we need the dojo/store/Memory dependency we simply create a dojo
            //store of in memory objects and let that be the store of our FilteredDropdown
            var store = new Memory({
                data: pollData
            });

            this.selectPolls.store = store;
            this.selectPolls.set('value', selected);
        },
        _refreshAnswers: function (selected) {
            this.titlePane.destroyDescendants();
            //destroy any eventual previous answers
            if (selected <= 0)
                return;

            var selectedPoll;

            jQuery.ajax({
                url: '/api/polls/'+selected,
                contentType: 'application/json; charset=utf-8',
                success: function (result) {
                    selectedPoll = JSON.parse(result);
                },
                async: false
            });

            //DeleteableTextBox? It’s a simple module that we’ll create soon
            for (var i = 0; i < selectedPoll.Answers.length; i++) {
                var textBox = new DeleteableTextBox({
                    name: 'text',
                    readOnly: true,
                    value: selectedPoll.Answers[i].Answer,
                    style: 'display:table; margin-bottom:10px;',
                    answerId: selectedPoll.Answers[i].AnswerId
            });
                this.titlePane.addChild(textBox, i);
            }
        },
        _onDeletePollClick: function() {
        //This method should be pretty self explanatory, we delete the poll and refresh
        //our dropdown and answers
            if (confirm('Are you sure you want to delete this magnificent poll?')) {
                jQuery.ajax({
                    url: '/api/polls/' + this.get('value'),
                    type: 'DELETE',
                    contentType: 'application/json; charset=utf-8',
                    success: function (result) {
                    },
                    async: false
                });

                this._refreshAnswers(-1);
                this._refreshDropDown(-1);
            }
        },
        _onInputWidgetChanged: function(value) {
             //This function is important, if the value in the FilteredDropDown
             //changes we publish the event to inform EPi that the property has changed.
             this._updateValue(value);
        }
    });
That’s it! But since we haven’t created the DeleteableTextBox and the PollDialog yet we still aren’t done. Lets have a look at the DeleteableTextBox real quick.
define([
  "epi",
  "dojo",
  "dijit/form/TextBox",
  "dojo/text!./templates/deleteabletextbox.html",
], function (epi, dojo, TextBox, template) {
  return dojo.declare("whatever.editors.DeleteableTextBox", [TextBox], {
    templateString: template,
    answerId: -1,
    postCreate: function () {
      this.inherited(arguments);
      this.connect(
        this.clearButton,
        "onclick",
        dojo.hitch(this, function () {
          jQuery.ajax({
            url: "/api/answers/" + this.answerId,
            type: "DELETE",
            contentType: "application/json; charset=utf-8",
            success: function (result) {},
            async: false,
          });
          this.destroy();
        })
      );
    },
    _valueChanged: function () {
      if (this.onTextChange) {
        this.onTextChange();
      }
    },
  });
});
Now that’s a lot simpler. We just create a simple module that inherits from dijit.form.TextBox and add some functionality for deleting the associated answer. Here’s the html template.
<div class="dijit dijitReset dijitInline dijitLeft" waiRole="presentation">
  <div class="dijitReset dijitInputField dijitInputContainer">
    <div style="float: left;width:100%;">
      <div style="float: left; padding-right: 16px;">
        <input
          class="dijitReset dijitInputInner"
          dojoAttachPoint="textbox,focusNode"
          dojoAttachEvent="onkeyup: _valueChanged"
          autocomplete="off"
        />
      </div>
    </div>
    <span
      class="epiDeleteIcon"
      dojoAttachPoint="clearButton"
      style="width:16px; height: 16px; float: left; margin-left: -16px; position:relative; top:3px;"
      alt=""
    ></span>
    <div
      style="clear: both; width: 0; height: 0; border: 0; padding: 0; margin: 0;"
    ></div>
  </div>
</div>
All right, almost done. Lets have a look at the dialog.
define([
  "dojo/_base/connect",
  "dojo/_base/declare",

  "dijit/_CssStateMixin",
  "dijit/_Widget",
  "dijit/_TemplatedMixin",
  "dijit/_WidgetsInTemplateMixin",

  "epi/dependency",
  "epi/epi",
  "epi/shell/widget/_ValueRequiredMixin",
  "dojo/text!./templates/polldialog.html",
], function (
  connect,
  declare,
  _CssStateMixin,
  _Widget,
  _TemplatedMixin,
  _WidgetsInTemplateMixin,
  dependency,
  epi,
  _ValueRequiredMixin,
  template
) {
  return declare(
    "whatever.editors.PollDialog",
    [
      _Widget,
      _TemplatedMixin,
      _WidgetsInTemplateMixin,
      _CssStateMixin,
      _ValueRequiredMixin,
    ],
    {
      templateString: template,
      intermediateChanges: false,
      value: null,
      store: null,
      postCreate: function () {
        // call base implementation
        this.inherited(arguments);
      },
      focus: function () {
        this.input.focus();
      },
      parseValues: function () {
        var data = { pollHeading: this.input.get("value"), answers: [] };

        data.answers = $(this.qlist)
          .find("input")
          .map(function () {
            if ($(this).val()) {
              return $(this).val();
            }
          })
          .get();

        return data;
      },
      _getValueAttr: function () {
        return this.parseValues();
      },
    }
  );
});
Pretty straightforward as well. The only thing really worth mentioning is the parseValues function that
makes sure that we return a JavaScript object that corresponds to a complete poll,
this is why we in the _onExecuted function can get a poll to post from the dialog like
this var pollData = this.pollDialog.get('value');.
Here’s the html template for the dialog.
<div>
  <div
    class="editor-label"
    style="float: left;"
    dojoattachpoint="labelContainer"
  >
    <label dojoattachpoint="label">Choose a heading for your poll</label>
  </div>
  <div style="clear: both; height: 10px;"></div>
  <div class="editor-field" dojoattachpoint="inputContainer">
    <div
      style="width:520px;"
      data-dojo-type="dijit.form.TextBox"
      dojoattachpoint="input"
    ></div>
  </div>
  <div style="clear: both;"></div>
  <div style="padding:20px 0 0 20px;">
    <ul dojoattachpoint="qlist">
      <li style="margin-bottom:10px;">
        Answer 1:
        <div
          style="width:437px;"
          data-dojo-type="dijit.form.TextBox"
          dojoattachpoint="q1"
        ></div>
      </li>
      <li style="margin-bottom:10px;">
        Answer 2:
        <div
          style="width:437px;"
          data-dojo-type="dijit.form.TextBox"
          dojoattachpoint="q2"
        ></div>
      </li>
      <li style="margin-bottom:10px;">
        Answer 3:
        <div
          style="width:437px;"
          data-dojo-type="dijit.form.TextBox"
          dojoattachpoint="q3"
        ></div>
      </li>
      <li style="margin-bottom:10px;">
        Answer 4:
        <div
          style="width:437px;"
          data-dojo-type="dijit.form.TextBox"
          dojoattachpoint="q4"
        ></div>
      </li>
      <li style="margin-bottom:10px;">
        Answer 5:
        <div
          style="width:437px;"
          data-dojo-type="dijit.form.TextBox"
          dojoattachpoint="q5"
        ></div>
      </li>
    </ul>
  </div>
</div>
And now we’re finally done with the plugin. We just need to setup a property on one of our ContentTypes like this.
[ClientEditor(ClientEditingClass = "whatever.editors.PollCreation")]
public virtual int Poll { get; set; }
Ok, lets have a look at the result.
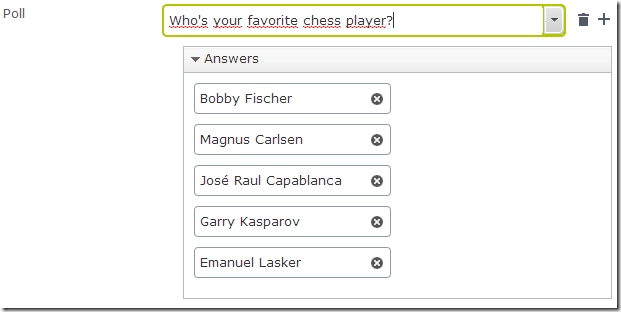
Our property should now look something like this.

And if we select a poll:
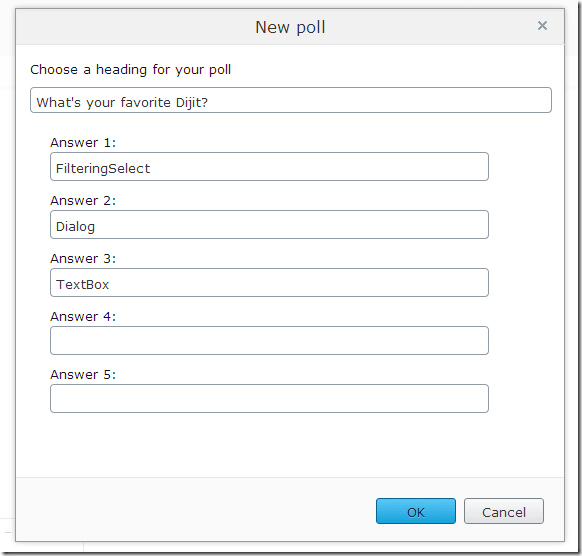
Deleting a poll is as simple as clicking on the waste basket icon, and if we click the + we’ll see our dialog in action:
And that’s it! It took some effort and we could definitely have polished this a bit more, but I hope building custom properties for EPiServer now feels a bit more doable.
You might have noted that I do not have a POST method in my web api controller which means that we’ll get an error when we try to create a new poll. That could be easily remedied by adding a post method, something like this:
public SimplePoll Post(string pollHeading, string answers)
    {
        var poll = new SimplePoll()
        {
            PollId  = 666,
            Header = pollHeading,
            Answers = new List<SimpleAnswer>()
        };

        int i = 500;

        if (string.IsNullOrEmpty(answers))
        {
            return poll;
        }

        var answersArray = answers.Split(",".ToCharArray(), StringSplitOptions.RemoveEmptyEntries);

        foreach (var item in answersArray)
        {
            poll.Answers.Add(new SimpleAnswer() { Answer = item, AnswerId = i++ });
        }
    return poll;
}
However this still won’t work as we do not persist any data. But if you had an underlying database or some other type of persistence it would work as expected.